3D Printing Nintendo LABO Waveform Cards
April 23, 2018
A Rubik's Cube is a cool toy.
An Etch-A-Sketch is a cool toy.
Novelty chattering teeth are, similarly, a cool toy.
Nintendo LABO might just be... the coolest toy of all time.
To me, there's something really magical about taking a stack of preforated cardboard,
some reflective tape, and a rubber band and somehow turning it into a fully functional
piano(/synthesizer).

...Admittedly, the piano kit is the only one I've built so far.
You could say that I got distracted.
The Idea
By far my favorite feature of the toy-con piano is its use of Waveform Cards. The idea here
is that you can cut a waveform out of paper or cardboard, slide it into the top of the
piano, and the right joy-con's infrared camera will scan the card and generate a playable instrument
from it. It's really fantastic stuff.

You get a few Waveform Cards with the kit - a sine wave, sawtooth wave, and a blank Waveform Card for
tracing onto the material of your choice.

It looks like you also get a fish card. I haven't made it to that part yet.
BUT... I don't wanna trace things. I wanna 3D print things.
Step 1. Reverse Engineering
It shakes out something like this - the darker brown area is space unseen by the joy-con's camera,
and therefore unusable. The rest is fair game for drawing waves.

Using this as a template, we can quickly create several simple waveforms.


Step 2. Taking It Further
In the LABO Waveform Card tutorial, they show approximations of piano and violin waveforms as
inspiration for creating your own waves.
Well color me inspired.
I opened up some soundfonts in FL Studio and poked around till I found instruments with
nice, periodic waveforms (visualizing with Soundcard Oscilloscope).

This one is a celesta.
The next step was to trace the waveform to a path in Inkscape, then carve that shape
out of the template.

At this point you could print to-scale replicas of these cards using a desktop printer, or...
Step 3. The Third Dimension
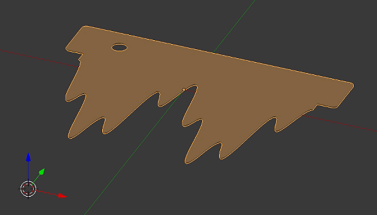
Now comes the fun part. Import SVG to Blender, extrude face, pop the hole out. Slice it up in Cura then wait for your 3D printer to heat up!
I'm pretty happy with how these turned out! The edges are a lot cleaner than I could have cut by hand,
and at 1.2mm thick, they're a good deal sturdier than cardboard or paper.
But, you're asking, how do they sound?
Step 4. Sound Test
I hope you like C Major chords :^)
As a thank you for reading through to the bottom of this page, here are all the files needed to
recreate these nine waveform cards, plus a template you can use to make new ones.
Included in this archive...
• SVG files for each card (print on a regular old desktop printer or even laser cutter if that's your kind of thing)
• STL (3D model) files for each card (NOTE: after converting from inches to mm and back, I'm pretty sure the units on these files are "off". When slicing in Cura, make sure "Uniform scale" (lil' lock icon) is enabled,
then set the dimension for the width of the card to 114.300 mm. The constraint should bring its height to
~78 or 79 mm. Now disable Uniform Scale and set the Z value (card thickness) to 1.2mm. GOLDEN.)
> > D O W N L O A D H E R E < <
Or, if you'd just like to peruse the catalog without downloading anything, you can open this PDF in your browser.
Makes
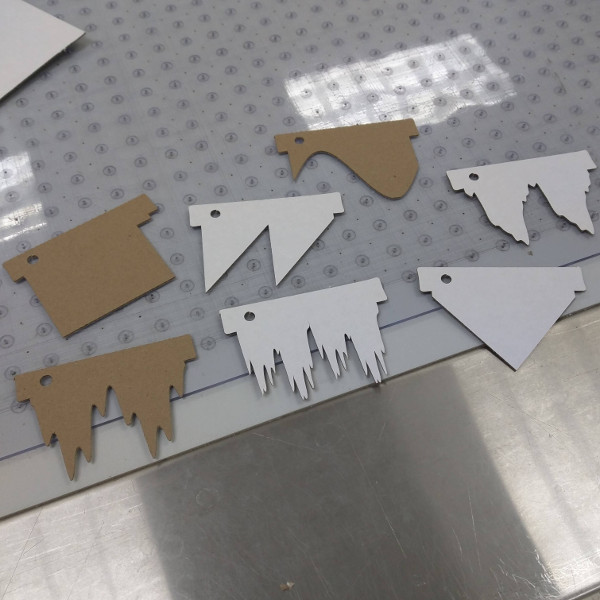
Reddit user compacta_d used a Kongsberg cutting table to cut these cards from E flute corrugated.
(link to discussion)

Reddit user AchillesPDX used a hobby laser cutter to cut these cards from cardboard.
(link to discussion)
Featured On
Hackaday
Adafruit Blog
All3DP
GoNintendo
Digg
Don't Call it a Postmortem...
Cause this project is still kickin'!
Watch the followup video here:
And download Waveform Card Pack 2 Here.
This one is a celesta.
The next step was to trace the waveform to a path in Inkscape, then carve that shape
out of the template.
At this point you could print to-scale replicas of these cards using a desktop printer, or...
Step 3. The Third Dimension
Now comes the fun part. Import SVG to Blender, extrude face, pop the hole out. Slice it up in Cura then wait for your 3D printer to heat up!
I'm pretty happy with how these turned out! The edges are a lot cleaner than I could have cut by hand,
and at 1.2mm thick, they're a good deal sturdier than cardboard or paper.
But, you're asking, how do they sound?
Step 4. Sound Test
I hope you like C Major chords :^)
As a thank you for reading through to the bottom of this page, here are all the files needed to
recreate these nine waveform cards, plus a template you can use to make new ones.
Included in this archive...
• SVG files for each card (print on a regular old desktop printer or even laser cutter if that's your kind of thing)
• STL (3D model) files for each card (NOTE: after converting from inches to mm and back, I'm pretty sure the units on these files are "off". When slicing in Cura, make sure "Uniform scale" (lil' lock icon) is enabled,
then set the dimension for the width of the card to 114.300 mm. The constraint should bring its height to
~78 or 79 mm. Now disable Uniform Scale and set the Z value (card thickness) to 1.2mm. GOLDEN.)
> > D O W N L O A D H E R E < <
Or, if you'd just like to peruse the catalog without downloading anything, you can open this PDF in your browser.
Makes
Reddit user compacta_d used a Kongsberg cutting table to cut these cards from E flute corrugated.
(link to discussion)
Reddit user AchillesPDX used a hobby laser cutter to cut these cards from cardboard.
(link to discussion)
Featured On
Hackaday
Adafruit Blog
All3DP
GoNintendo
Digg
Don't Call it a Postmortem...
Cause this project is still kickin'!
Watch the followup video here:
And download Waveform Card Pack 2 Here.
Step 3. The Third Dimension
Now comes the fun part. Import SVG to Blender, extrude face, pop the hole out. Slice it up in Cura then wait for your 3D printer to heat up!
I'm pretty happy with how these turned out! The edges are a lot cleaner than I could have cut by hand, and at 1.2mm thick, they're a good deal sturdier than cardboard or paper.
But, you're asking, how do they sound?
I hope you like C Major chords :^)
As a thank you for reading through to the bottom of this page, here are all the files needed to recreate these nine waveform cards, plus a template you can use to make new ones.
Included in this archive...
• SVG files for each card (print on a regular old desktop printer or even laser cutter if that's your kind of thing)
• STL (3D model) files for each card (NOTE: after converting from inches to mm and back, I'm pretty sure the units on these files are "off". When slicing in Cura, make sure "Uniform scale" (lil' lock icon) is enabled, then set the dimension for the width of the card to 114.300 mm. The constraint should bring its height to ~78 or 79 mm. Now disable Uniform Scale and set the Z value (card thickness) to 1.2mm. GOLDEN.)
> > D O W N L O A D H E R E < <
Or, if you'd just like to peruse the catalog without downloading anything, you can open this PDF in your browser.
Makes
(link to discussion)
(link to discussion)
Featured On
Hackaday
Adafruit Blog
All3DP
GoNintendo
Digg